0%

  1. 接著把 $_SESSION['cart'] 中所存的商品資訊列出來
    1
    2
    3
    4
    5
    6
    7
    8
    9
    10
    11
    12
    13
    14
    15
    16
    17
    18
    19
    20
    21
    22
    23
    24
    25
    26
    27
    28
    29
    30
    31
    32
    33
    34
    35
    <table class="all">
    <tr class="tt ct">
    <td>編號</td>
    <td>商品名稱</td>
    <td>數量</td>
    <td>庫存量</td>
    <td>單價</td>
    <td>小計</td>
    <td>刪除</td>
    </tr>
    <?php

    foreach($_SESSION['cart'] as $id => $qt){
    $row=$Goods->find($id);
    ?>
    <tr class="pp ct">
    <td><?=$row['no'];?></td>
    <td><?=$row['name'];?></td>
    <td><?=$qt;?></td>
    <td><?=$row['stock'];?></td>
    <td><?=$row['price'];?></td>
    <td><?=$row['price']*$qt;?></td>
    <td>
    <img src="./icon/0415.jpg" onclick="delCart(<?=$id;?>)">
    </td>
    </tr>
    <?php
    }
    ?>
    </table>
    <div class="ct">
    <img src="./icon/0411.jpg" onclick="location.href='index.php'">
    <img src="./icon/0412.jpg" onclick="location.href='?do=checkout'">
    </div>

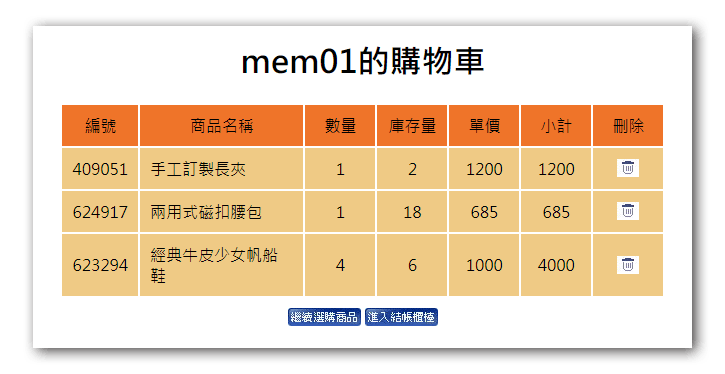
  1. 在建立購物商品列表時,使用內建的css 樣式.all時會發現表格的大小超出版面範圍,這時可以去css檔案調整一下內距和右側區塊的大小,讓畫面可以容納更多的內容。
    /css/css.css

    1
    2
    3
    4
    5
    .all td
    {
    min-width:50px;
    padding:10px;
    }
  2. 雖然參考畫面中的購物車列表把商品數量以input的欄位來顯示,但題目中並沒有說明這個input欄位是否有其它的功能,比如改變數量時,小計欄位也會跟著改變,為了減少不必要的爭議,這邊我是使用直接顯示的方式來處理,如果要改變數量的話,可以回到商品詳細內容去重新填入數量即可。

  3. 刪除購物車商品的功能我們使用ajax的方式建立一個 delCart(id) 函式,將要刪除的商品id傳到後台api去,然後由api來刪除session中的商品內容,完成後再使用 location.href='?do=buycart 來重新載入頁面同時清除網址帶的商品參數,藉此達成題目要求的功能

    1
    2
    3
    4
    5
    function delCart(id){
    $.post("./api/del_cart.php",{id},()=>{
    location.href='index.php?do=buycart';
    })
    }
  4. 建立 ./api/del_cart.php的檔案,並撰寫刪除購物車商品的功能。

    1
    2
    3
    include_once "../base.php";

    unset($_SESSION['cart'][$_POST['id']]);

購物功能我們切成兩個部份來製作,一個是會員登入及註冊,一個則是登入後的購物功能,題目在這邊的描述並不是很清楚,簡單來說,就是購物車的功能必須是登入的會員才能看到及使用的,如果不是登入的會員則會被導引去進行會員註冊或登入。

閱讀全文 »

  1. 先在類別中建立判斷分類及取得商品的方法
    /controller/Type.php

    1
    2
    3
    4
    5
    6
    7
    8
    9
    10
    11
    12
    13
    14
    15
    16
    17
    18
    19
    20
    21
    22
    23
    24
    25
    26
    27
    28
    29
    30
    31
    32
    33
    34
    35
    36
    37
    38
    39
    40
    41
    42
    43
    44
    45
    46
    47
    48
    49
    50
    51
    52
    53
    54
    55
    56
    57
    58
    59
    60
    61
    62
    63
    64
    65
    66
    include_once "DB.php";

    //因為會撈出商品,所以引入商品類別
    include_once "Goods.php";

    /**
    * 根據傳入的id來判斷這個類別是大分類還是中分類
    * 如果資料的big欄位是0就是大分類
    * 如果資料的big欄位>0就是中分類
    */
    function type($id){
    if($id!=0){
    $row=$this->find($id);
    $type=($row['big']==0)?'big':'mid';
    }else{
    $type="all";
    }
    return $type;
    }

    /**
    * 根據傳入的type id來產生畫面需要的導覽文字
    * 大分類則只有大分類的名字
    * 中分類則會產生 大分類 > 中分類的文字
    */
    function nav($id){
    $type=$this->type($id);
    $nav='';
    switch($type){
    case "all":
    $nav="全部商品";
    break;
    case "big":
    $row=$this->find($id);
    $nav=$row['name'];
    break;
    case "mid":
    $row=$this->find($id);
    $big=$this->find($row['big']);
    $nav=$big['name'] . " > ".$row['name'];
    break;
    }
    return $nav;
    }

    /**
    * 根據分類id來決定要撈出那些商品
    * all:全部設為上架的商品
    * big:指定大分類的商品
    * mid:指定中分類的商品
    */
    function items($id){
    $type=$this->type($id);
    switch($type){
    case "all":
    $rows=(new Goods)->all(['sh'=>1]);
    break;
    case "big":
    $rows=(new Goods)->all(['big'=>$id,'sh'=>1]);
    break;
    case "mid":
    $rows=(new Goods)->all(['mid'=>$id,'sh'=>1]);
    break;
    }
    return $rows;
    }
  2. 建立 ./view/front/main.php 並撰寫導航文字及撈出商品內容的程式碼,注意商品簡介只需要顯示固定長度的一部份字串即可。

    1
    2
    3
    4
    5
    6
    <h2>
    <?php
    $type=$_GET['type']??0;
    echo $Type->nav($type);
    ?>
    </h2>
  3. 依據網址的類別id可以取得要顯示的商品,並顯示在頁面上。

    1
    2
    3
    4
    5
    6
    7
    8
    9
    10
    11
    12
    13
    14
    15
    16
    17
    18
    19
    20
    21
    22
    23
    24
    25
    26
    27
    28
    29
    30
    <?php 
    $items=$Type->items($type);
    foreach ($items as $item) {
    ?>
    <div class="block">
    <div class="pp ct">
    <a href='?do=intro&id=<?=$item['id'];?>'>
    <img src="./upload/<?=$item['img'];?>" alt="">
    </a>
    </div>
    <div class="pp">
    <div class="info tt ct"><?=$item['name'];?></div>
    <div class="info pp">
    價錢:<?=$item['price'];?>
    <a href="?do=buycart&id=<?=$item['id'];?>&qt=1" style="float:right">
    <img src="./icon/0402.jpg" alt="">
    </a>
    </div>
    <div class="info pp">
    規格:<?=$item['spec'];?>
    </div>
    <div class="info pp">
    簡介:<?=$item['intro'];?>
    </div>
    </div>
    </div>

    <?php
    }
    ?>
  4. 加上一些CSS來稍微美化一下畫面

    1
    2
    3
    4
    5
    6
    7
    8
    9
    10
    11
    12
    13
    14
    15
    16
    17
    18
    19
    20
    21
    22
    23
    24
    25
    26
    27
    28
    29
    30
    31
    32
    <style>
    .block{
    width:80%;
    margin: 2px auto;
    min-width: 150px;;
    display: flex;
    }
    .block > div:nth-child(1){
    width:40%;
    display:flex;
    justify-content: center;
    align-items: center;
    padding:10px;
    }
    .block > div:nth-child(1) img{
    width:150px;
    height:120px;
    }
    .block > div:nth-child(2){
    width:60%;
    }
    .block .info{
    border:1px solid white;
    }
    .block .info:nth-child(1){
    border-top:none;

    }
    .block .info:nth-child(4){
    border-bottom:none;
    }
    </style>

  5. main.php 中要注意的是在使用者按下 我要購買 按鈕時,我們除了要把使用者導向購物車頁面外,也同時要把商品的id數量一起帶過去。

    1
    2
    3
    <a href="?do=buycart&id=<?=$item['id'];?>&qt=1" style="float:right">
    <img src="./icon/0402.jpg" alt="">
    </a>
  6. 建立 ./view/front/intro.php 檔案,並且撰寫商品詳細內容的頁面。

    1
    2
    3
    4
    5
    6
    7
    8
    9
    10
    11
    12
    13
    14
    15
    16
    17
    18
    19
    20
    21
    22
    23
    24
    25
    26
    27
    28
    29
    30
    31
    32
    33
    34
    35
    36
    37
    38
    39
    40
    41
    42
    43
    44
    45
    46
    47
    48
    49
    50
    51
    52
    53
    54
    55
    <?php 
    $row=$Goods->find($_GET['id']);
    ?>

    <h2 class="ct"><?=$row['name'];?></h2>
    <style>
    .item *{
    box-sizing: border-box;
    }
    .item{
    display: flex;
    }
    .item > div:nth-child(1){
    width:60%;
    padding:10px;
    height:350px;
    display:flex;
    justify-content: center;
    align-items: center;
    }
    .item img{
    width:100%;
    height:100%;
    }
    .item > div:nth-child(2){
    width:40%;
    }
    .info{
    display:flex;
    flex-wrap:wrap;
    }
    .info div{
    margin:1px 0;
    padding:2px;
    width:100%;
    }
    </style>
    <div class="item all">
    <div class="pp">
    <img src="./upload/<?=$row['img'];?>" alt="">
    </div>
    <div class="info">
    <div class="pp">分類:<?=$Type->nav($row['mid']);?></div>
    <div class="pp">編號:<?=$row['no'];?></div>
    <div class="pp">價格:<?=$row['price'];?></div>
    <div class="pp">詳細說明:<?=$row['intro'];?></div>
    <div class="pp">庫存量:<?=$row['stock'];?></div>
    </div>
    </div>
    <div class="ct tt all">
    購買數量:
    <input type="number" name="qt" id="qt" value="1" style="width:35px">
    <a href="javascript:buy(<?=$row['id'];?>)"><img src="./icon/0402.jpg" ></a>
    </div>

  1. 在詳細內容頁面中,要注意的是我們採用 javascript 的方式來做商品資料的傳送,函式中把商品id傳出去,這在使用者按下我要購買後會觸發buy()函式,並取得使用者選購的數量,然後把商品 id及商品數量帶入 location 語法中,導向購物車頁面。
    1
    2
    3
    4
    5
    function buy(id){
    let qt=$("#qt").val()
    location.href=`?do=buycart&id=${id}&qt=${qt}`

    }

  1. ./view/backend/ 目錄中新增 add_goods.php,並撰寫新增商品需要的表單內容
    1
    2
    3
    4
    5
    6
    7
    8
    9
    10
    11
    12
    13
    14
    15
    16
    17
    18
    19
    20
    21
    22
    23
    24
    25
    26
    27
    28
    29
    30
    31
    32
    33
    34
    35
    36
    37
    38
    39
    40
    41
    42
    43
    44
    45
    46
    47
    48
    49
    50
    51
    52
    53
    54
    55
    56
    57
    58
    59
    60
    61
    62
    63
    <h2 class="ct">新增商品</h2>
    <form action="./api/save_goods.php" method="post" enctype="multipart/form-data">
    <table class="all">
    <tr>
    <td class="tt ct">所屬大分類</td>
    <td class="pp">
    <select name="big" id="big"></select>
    </td>
    </tr>
    <tr>
    <td class="tt ct">所屬中分類</td>
    <td class="pp">
    <select name="mid" id="mid"></select>
    </td>
    </tr>
    <tr>
    <td class="tt ct">商品編號</td>
    <td class="pp" id="no">
    完成分類後自動分配
    </td>
    </tr>
    <tr>
    <td class="tt ct">商品名稱</td>
    <td class="pp">
    <input type="text" name="name" id="name">
    </td>
    </tr>
    <tr>
    <td class="tt ct">商品價格</td>
    <td class="pp">
    <input type="number" name="price" id="price">
    </td>
    </tr>
    <tr>
    <td class="tt ct">規格</td>
    <td class="pp">
    <input type="text" name="spec" id="spec">
    </td>
    </tr>
    <tr>
    <td class="tt ct">庫存量</td>
    <td class="pp">
    <input type="number" name="stock" id="stock">
    </td>
    </tr>
    <tr>
    <td class="tt ct">商品圖片</td>
    <td class="pp">
    <input type="file" name="img" id="img">
    </td>
    </tr>
    <tr>
    <td class="tt ct">商品介紹</td>
    <td class="pp">
    <textarea name="intro" id="intro" style="width:80%;height:150px"></textarea>
    </td>
    </tr>
    </table>
    <div class="ct">
    <input type="submit" value="新增">
    <input type="reset" value="重置">
    <input type="button" value="返回" onclick="location.href='?do=th'"></div>
    </form>

  1. 製作大分類和中分類的選單連動功能,這邊我們利用和題組三訂票功能一樣的ajax方式來達成
    1
    2
    3
    4
    5
    6
    7
    8
    9
    10
    11
    12
    13
    14
    15
    16
    17
    18
    19
    20
    getBigs();

    $("#big").on("change",function(){
    getMids($("#big").val())
    })

    function getBigs(){
    $.get("./api/bigs.php",(bigs)=>{
    $("#big").html(bigs)

    getMids($("#big").val())
    })
    }

    function getMids(id){
    $.get("./api/mids.php",{id},(mids)=>{
    $("#mid").html(mids)
    })
    }

  1. ./api/ 目錄中新增 save_goods.php,並撰寫新增商品資料到資料表的程式碼,此時要記得產生一組商品編號後才寫入到資料表
    1
    2
    3
    4
    5
    6
    7
    8
    9
    10
    11
    12
    13
    14
    15
    16
    include_once "../base.php";

    if(!empty($_FILES['img']['tmp_name'])){
    move_uploaded_file($_FILES['img']['tmp_name'],'../upload/'.$_FILES['img']['name']);
    $_POST['img']=$_FILES['img']['name'];
    }

    //判斷表單資料中是否有id這個欄位來決定是新增資料還是更新資料
    if(!isset($_POST['id'])){
    $_POST['no']=rand(100000,999999);
    $_POST['sh']=1;
    }

    $Goods->save($_POST);

    to("../backend.php?do=th");
  2. 新增商品功能完成後就可以先回到商品管理頁面把商品列表的程式碼完成
    1
    2
    3
    4
    5
    6
    7
    8
    9
    10
    11
    12
    13
    14
    15
    16
    17
    18
    19
    20
    21
    22
    23
    24
    25
    26
    <table class="all">
    <tr class="tt ct">
    <td>編號</td>
    <td>商品名稱</td>
    <td>庫存量</td>
    <td>狀態</td>
    <td>操作</td>
    </tr>
    <?php
    $rows=$Goods->all();
    foreach($rows as $row){
    ?>
    <tr class="pp ct">
    <td><?=$row['no'];?></td>
    <td><?=$row['name'];?></td>
    <td><?=$row['stock'];?></td>
    <td><?=($row['sh']==1)?"販售中":"已下架";?></td>
    <td>
    <button onclick="location.href='?do=edit_goods&id=<?=$row['id'];?>'">修改</button>
    <button onclick="del('Goods',<?=$row['id'];?>)">刪除</button>
    <button onclick="sw(<?=$row['id'];?>,1)">上架</button>
    <button onclick="sw(<?=$row['id'];?>,0)">下架</button>
    </td>
    </tr>
    <?php } ?>
    </table>

  1. 複製 ./view/backend/add_goods.php,改名為 edit_goods.php,並將商品資料填入對應的表單欄位中,要記得加入隱藏欄位id
    1
    2
    3
    4
    5
    6
    7
    8
    9
    10
    11
    12
    13
    14
    15
    16
    17
    18
    19
    20
    21
    22
    23
    24
    25
    26
    27
    28
    29
    30
    31
    32
    33
    34
    35
    36
    37
    38
    39
    40
    41
    42
    43
    44
    45
    46
    47
    48
    49
    50
    51
    52
    53
    54
    55
    56
    57
    58
    59
    60
    61
    62
    63
    64
    65
    66
    67
    <?php $row=$Goods->find($_GET['id']);?>
    <h2 class="ct">修改商品</h2>
    <form action="./api/save_goods.php" method="post" enctype="multipart/form-data">
    <table class="all">
    <tr>
    <td class="tt ct">所屬大分類</td>
    <td class="pp">
    <select name="big" id="big">

    </select>
    </td>
    </tr>
    <tr>
    <td class="tt ct">所屬中分類</td>
    <td class="pp">
    <select name="mid" id="mid"></select>
    </td>
    </tr>
    <tr>
    <td class="tt ct">商品編號</td>
    <td class="pp" id="no">
    <?=$row['no'];?>
    </td>
    </tr>
    <tr>
    <td class="tt ct">商品名稱</td>
    <td class="pp">
    <input type="text" name="name" value="<?=$row['name'];?>">
    </td>
    </tr>
    <tr>
    <td class="tt ct">商品價格</td>
    <td class="pp">
    <input type="number" name="price" value="<?=$row['price'];?>">
    </td>
    </tr>
    <tr>
    <td class="tt ct">規格</td>
    <td class="pp">
    <input type="text" name="spec" value="<?=$row['spec'];?>">
    </td>
    </tr>
    <tr>
    <td class="tt ct">庫存量</td>
    <td class="pp">
    <input type="number" name="stock" value="<?=$row['stock'];?>">
    </td>
    </tr>
    <tr>
    <td class="tt ct">商品圖片</td>
    <td class="pp">
    <input type="file" name="img" id="img">
    </td>
    </tr>
    <tr>
    <td class="tt ct">商品介紹</td>
    <td class="pp">
    <textarea name="intro" id="intro" style="width:80%;height:150px"><?=$row['intro'];?></textarea>
    </td>
    </tr>
    </table>
    <div class="ct">
    <input type="hidden" name="id" value="<?=$_GET['id'];?>">
    <input type="submit" value="修改">
    <input type="reset" value="重置">
    <input type="button" value="返回" onclick="location.href='?do=th'"></div>
    </form>

  1. 在修改商品的功能中,針對分類選單,除了原本新增商品的連動選單功能外,我們還要針對當前商品的分類來指定選單的選中項目,這邊利用到選擇器的屬性選擇器及jQuery的 prop() 函式來選定表單的選項
    1
    2
    3
    4
    5
    6
    7
    8
    9
    10
    11
    12
    13
    14
    15
    16
    17
    18
    //建立頁面載入時的第一次選單內容
    $("#big").load("api/load_type.php",{type:'big'},()=>{

    //利用商品id來取得對大分類選單的選定狀態
    $("#big option[value='<?=$row['big'];?>']").prop("selected",true)

    //載入大分類後,接著要依照大分類的選單內容來撈出中分類的選單內容
    $("#mid").load("api/load_type.php",{type:'mid',parent:$("#big").val()},()=>{

    //利用商品id來取得對中分類選單的選定狀態
    $("#mid option[value='<?=$row['mid'];?>']").prop("selected",true)
    })
    })

    //建立大分類選單改變時的中分類選單內容
    $("#big").on('change',function(){
    $("#mid").load("api/load_type.php",{type:'mid',parent:$("#big").val()})
    })

  1. 為了做到登入時讓不同的管理者帳號有不同的權限限制,我們先在類別中建立回傳當前管理者權限的方法。
    /controller/Admin.php

    1
    2
    3
    4
    5
    6
    function pr(){
    $admin=$this->find(['acc'=>$_SESSION['admin']]);
    $pr=unserialize($admin['pr']);

    return $pr;
    }
  2. backend.php 的選單中撰寫依據權限來決定是否顯示功能的程式

    1
    2
    3
    4
    5
    6
    7
    8
    9
    10
    11
    <div style="min-height:400px;">
    <a href="?do=admin">管理權限設置</a>
    <?php
    echo in_array(1,$Admin->pr())?"<a href='?do=th'>商品分類與管理</a>":"";
    echo in_array(2,$Admin->pr())?"<a href='?do=order'>訂單管理</a>":"";
    echo in_array(3,$Admin->pr())?"<a href='?do=user'>會員管理</a>":"";
    echo in_array(4,$Admin->pr())?"<a href='?do=bot'>頁尾版權管理</a>":"";
    echo in_array(5,$Admin->pr())?"<a href='?do=news'>最新消息管理</a>":"";
    ?>
    <a href="./api/logout.php?do=admin" style="color:#f00;">登出</a>
    </div>

  1. ./view/backend/ 目錄中建立 add_admin.php 檔案,並建立新增管理帳號的頁面及表單
    1
    2
    3
    4
    5
    6
    7
    8
    9
    10
    11
    12
    13
    14
    15
    16
    17
    18
    19
    20
    21
    22
    23
    24
    25
    26
    27
    28
    29
    30
    31
    32
    33
    34
    35
    36
    37
    38
    39
    40
    41
    42
    <h2 class="ct">新增管理帳號</h2>
    <form action="./api/save_admin.php" method="post">
    <table class="all">
    <tr>
    <td class="tt ct">帳號</td>
    <td class="pp"><input type="text" name="acc" id="acc"></td>
    </tr>
    <tr>
    <td class="tt ct">密碼</td>
    <td class="pp"><input type="password" name="pw" id="pw"></td>
    </tr>
    <tr>
    <td class="tt ct">權限</td>
    <td class="pp">
    <div>
    <input type="checkbox" name="pr[]" value="1">
    商品分類與管理
    </div>
    <div>
    <input type="checkbox" name="pr[]" value="2">
    訂單管理
    </div>
    <div>
    <input type="checkbox" name="pr[]" value="3">
    會員管理
    </div>
    <div>
    <input type="checkbox" name="pr[]" value="4">
    頁尾版權區管理
    </div>
    <div>
    <input type="checkbox" name="pr[]" value="5">
    最新消息管理
    </div>
    </td>
    </tr>
    </table>
    <div class="ct">
    <input type="submit" value="新增">
    <input type="reset" value="重置">
    </div>
    </form>

  1. ./api/ 目錄中建立 save_admin.php 檔案,並撰寫新增/更新管理帳號的程式碼
    1
    2
    3
    4
    5
    6
    7
    include_once "../base.php";

    //使用序列化的方式將權限陣列轉成字串
    $_POST['pr']=serialize($_POST['pr']);
    $Admin->save($_POST);

    to("../backend.php");
  2. 複製一份 ./view/backend/add_admin.php 並改名為 edit_admin.php ,然後根據 $_GET['id'] 的值來取出資料
  3. 要記得在 edit_admin.php 中增加一個隱藏欄位把資料的 id 值帶入
    1
    2
    3
    4
    5
    6
    7
    8
    9
    10
    11
    12
    13
    14
    15
    16
    17
    18
    19
    20
    21
    22
    23
    24
    25
    26
    27
    28
    29
    30
    31
    32
    33
    34
    35
    36
    37
    38
    39
    40
    41
    42
    43
    44
    45
    46
    $row=$Admin->find($_GET['id']);
    $row['pr']=unserialize($row['pr']);
    ?>
    <h2 class="ct">修改管理員權限</h2>
    <form action="./api/save_admin.php" method="post">
    <table class="all">
    <tr>
    <td class="tt ct">帳號</td>
    <td class="pp"><input type="text" name="acc" value="<?=$row['acc'];?>"></td>
    </tr>
    <tr>
    <td class="tt ct">密碼</td>
    <td class="pp"><input type="password" name="pw" value="<?=$row['pw'];?>"></td>
    </tr>
    <tr>
    <td class="tt ct">權限</td>
    <td class="pp">
    <div>
    <input type="checkbox" name="pr[]" value="1" <?=(in_array(1,$row['pr']))?'checked':'';?>>
    商品分類與管理
    </div>
    <div>
    <input type="checkbox" name="pr[]" value="2" <?=(in_array(2,$row['pr']))?'checked':'';?>>
    訂單管理
    </div>
    <div>
    <input type="checkbox" name="pr[]" value="3" <?=(in_array(3,$row['pr']))?'checked':'';?>>
    會員管理
    </div>
    <div>
    <input type="checkbox" name="pr[]" value="4" <?=(in_array(4,$row['pr']))?'checked':'';?>>
    頁尾版權區管理
    </div>
    <div>
    <input type="checkbox" name="pr[]" value="5" <?=(in_array(5,$row['pr']))?'checked':'';?>>
    最新消息管理
    </div>
    </td>
    </tr>
    </table>
    <div class="ct">
    <input type="hidden" name="id" value="<?=$row['id'];?>">
    <input type="submit" value="修改">
    <input type="reset" value="重置">
    </div>
    </form>