題組二的後台相較題組一簡單許多,甚至沒有新增文章的功能,所以我們需要手動先把文章匯入到資料庫去,也因此,所以題組二的後台容易拿分,可以安排在會員註冊登入完成後就先來製作後台的功能,確認這部份的分數是有先到手的。
依題意,後台有一個提示選擇管理項目的頁面,我們直接把這段文字放在 /view/backend/main.php 中,使用 H1 級的標籤及置中的 class 就可以了
1
| <h1 class='ct'>請選擇管理功能</h1>
|
依題意,修改 backend.php 左側選單的文字和連結
1
2
3
4
5
6
7
| <div class="hal" id="lef">
<a class="blo" href="?do=user">帳號管理</a>
<a class="blo" href="?do=po">分類網誌</a>
<a class="blo" href="?do=news">最新文章管理</a>
<a class="blo" href="?do=know">講座管理</a>
<a class="blo" href="?do=que">問卷管理</a>
</div>
|
建立 /view/backend/user.php 檔案來製作帳號管理功能
建立 /view/backend/po.php 及 /view/backend/know.php 兩個檔案,內容只須註明”依題意此功能不需製作”即可,不建立也可以,因為找不到對應的檔案時會自動載入 main.php
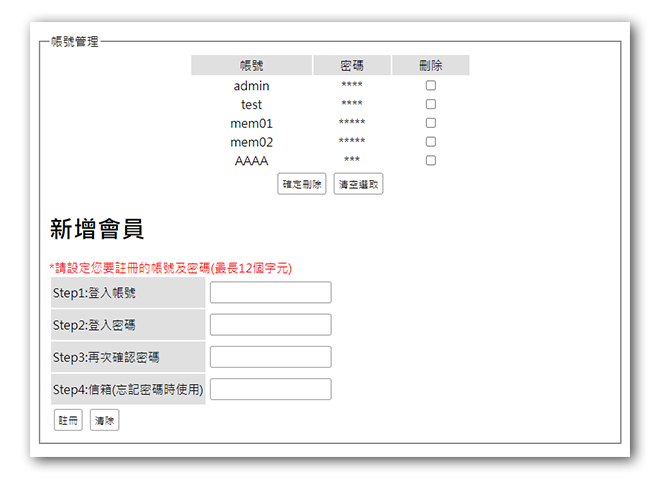
建立帳號管理頁面
先在類別中建立後台頁面需要的變數內容
/Controller/User.php
1
2
3
4
5
6
7
| function backend(){
$data=[
'rows'=>$this->all(),
];
$this->view("./view/backend/user.php",$data);
}
|
/view/backend/user.php
1
2
3
4
5
6
7
8
9
10
11
12
13
14
15
16
17
18
19
20
21
22
23
24
25
26
27
28
29
| <fieldset>
<legend>帳號管理</legend>
<form action="./api/user_admin.php" method='post'>
<table class="ct" style="width:50%;margin:auto">
<tr class='clo'>
<td>帳號</td>
<td>密碼</td>
<td>刪除</td>
</tr>
<?php
foreach($rows as $row){
?>
<tr>
<td><?=$row['acc'];?></td>
<td><?=str_repeat("*",strlen($row['pw']));?></td>
<td>
<input type="checkbox" name="del[]" value="<?=$row['id'];?>">
</td>
</tr>
<?php
}
?>
</table>
<div class="ct">
<input type="submit" value="確定刪除">
<input type="reset" value="清空選取">
</div>
</form>
</fieldset>
|
撰寫後端處理帳號刪除程式
1
2
3
4
5
6
7
8
9
| include_once "../base.php";
if(isset($_POST['del'])){
foreach($_POST['del'] as $id){
$User->del($id);
}
}
to("../backend.php?do=user");
|
建立新增會員頁面
由於後台的新增會員和前台的註冊會員是幾乎一樣的功能,因此可以直接把註冊會員的功能直接複製過來使用即可
1
2
3
4
5
6
7
8
9
10
11
12
13
14
15
16
17
18
19
20
21
22
23
24
25
26
27
28
29
| <h1>新增會員</h1>
<div style="color:red">
*請設定您要註冊的帳號及密碼(最長12個字元)
</div>
<table>
<tr>
<td class="clo">Step1:登入帳號</td>
<td><input type="text" name="acc" id="acc"></td>
</tr>
<tr>
<td class="clo">Step2:登入密碼</td>
<td><input type="password" name="pw" id="pw"></td>
</tr>
<tr>
<td class="clo">Step3:再次確認密碼</td>
<td><input type="password" name="pw2" id="pw2"></td>
</tr>
<tr>
<td class="clo">Step4:信箱(忘記密碼時使用)</td>
<td><input type="text" name="email" id="email"></td>
</tr>
<tr>
<td>
<button onclick="reg()">註冊</button>
<button onclick="clean()">清除</button></td>
<td></td>
</tr>
</table>
</div>
|
新增會員的js和後端php的部份可以延用註冊會員的程式即,但是題目在後台沒有提到需要出現彈出視窗提示,因此這邊我們可以在js上做點小修改,讓註冊完成直接重整畫面,就可以在上面的帳號管理中馬上看到新增的會員
1
2
3
4
5
6
7
8
9
10
11
12
13
14
15
16
17
18
19
20
21
22
23
24
25
26
27
| <script>
function reg(){
let info={
acc:$("#acc").val(),
pw:$("#pw").val(),
pw2:$("#pw2").val(),
email:$("#email").val(),
}
if(info.acc=='' || info.pw=='' || info.pw2=='' || info.email==''){
alert("不可空白");
}else if(info.pw!=info.pw2){
alert("密碼錯誤");
}else{
$.post("./api/chk_acc.php",{acc:info.acc},(res)=>{
if(parseInt(res)!==0){
alert("帳號重複");
}else{
$.post("./api/reg.php",info,()=>{
location.reload();
})
}
})
}
}
</script>
|